Showing posts with label must try. Show all posts

I want long hair!


One of my favorite websites for everything beauty and fashion is without question Refinery 29. I love that recently they're all about fashion, beauty and DIY tutorials. I'm especially in love with all of the hair ideas they've been featuring recently, too bad that most of them are for long haired girls only. I leave you with my favorite feature, where they show how to create 8 gorgeous updos (top knots and braids, woohoo!) perfect for summer. Some of them look like they might require a little bit of practice and elbow grease, but the results look well worth the effort! Check them all out here!


Una de mis páginas favoritas para moda y belleza es definitivamente Refinery 29. Me encanta que últimamente han subido muchos tutoriales sobre moda, belleza y manualidades. Estoy especialmente enamorada de todas las ideas para peinados que han subido recientemente, lástima que la mayoría solo funcionan si tenes el pelo largo. Las dejo con mi noticia favorita, donde muestran como crear 8 peinados  lindísimos (con trenzas y moños!), perfectos para nestro clima. Parece que algunos requieren un poco de práctica y fuerza de brazos, pero creo que los resultados valen la pena! Véanlos todos aquí!

Disney hair

Back in January, we promised ourselves to start off the year right and try to accomplish at least three things off of our New Year's Resolutions before the world ends year is over. The top three on our mile long list: exercise regularly, master the art of making perfect buttercream and to grow out our hair healthily. We're already doing something about 1 and 2, but so far we've neglected 3. Imagine if Ariel from the Little Mermaid were a real person, and her hair were featured on a Pantene-ad...long, gorgeous healthy and moving in slow motion. That's the kind of hair we want: mirror shiny hair, preferably of boob-covering length.

Because it's always better late than never, we've decided to look up hair treatments and share them with you! Though we usually swear by Kerastase hair products to keep our hair in tip top shape, they come with a VERY hefty price tag. So we're going to show you three homemade treatments on the cheap side to help us get those Ariel worthy locks, Prince Erick not included, sorry.

PS. Don't worry, none of these are stinky, gross or too messy. Eggs in our hair? Ew

Disney, giving us unrealistic expectations about hair


En enero nos prometimos a nosotras mismas que ibamos a tratar de cumplir al menos tres de nuestra larga lista de resoluciones para año nuevo antes de que se acabe el mundo terminara el 2012. Nuestro top 3 son: hacer ejercicio regularmente, hacer el turrón para pasteles perfecto y dejar crecer nuestro pelo. Ya estamos haciendo algo respecto a las primeras dos cosas, pero nos hemos olvidado de nuestro pelo. Imagínense si Ariel de La Sirenita fuera una persona real, y la contrataran para salir en un anuncio de Pantene... ESE pelo es el que queremos: larguísimo, saludable y brilloso! 

Porque siempre más vale tarde que nunca, hemos decidido buscar (googlear, ahem) tratamientos para cabello y compartirlos con ustedes! Usualmente ocupamos productos Kerastase para mantener nuestro pelo lindo, pero no son para nada amigos del presupuesto. Es por eso que nos hemos enfocado en buscar soluciones caseras BBB. Listas para cabellera estilo Ariel, lástima que no viene con Príncipe incluído. 

PS. Ninguno de estos remedios caseros apesta o requiere mucho esfuerzo para ponerse o quitarse. Nada de huevos ni aceite!


Ok so vinegar in your hair might sound harsh and stinky, but trust us, your hair will love it. Not to get too geeky about this, but you've probably heard on TV about shampoos that help "restore your hair's PH". Turns out your hair has an acid PH, just like vinegar, so using it to clean your hair restores its PH. What does that mean for you? It makes it shinier, stronger and less prone to breakage. At first it might be stinky, but once it dries, the smell disappears. If you're too worried about the smell, you can do this at night and wake up to great hair.

Puede que ocupar vinagre en tu pelo suene raro y apestoso, pero funciona. Probablemente ya han escuchado en la tele un shampoo/acondicionador que "restaura el PH de tu cabello". Sin ponernos muy científicas, resulta que el cabello tiene un PH ácido, igual que el vinagre, por eso restaura las hebras. Qué significa esto? Que las deja más brillantes, fuertes y menos quebradizas. La mezcla te puede parecer un poco apestosa al principio, pero el olor desaparece cuando el cabello ya está seco. Si te preocupa mucho el olor, aplicalo de noche.

Recipe: Mix 1 part vinegar and 2 parts of water, use this mixture as a final rinse once a week. / Mezcla 1 parte de vinagre con 2 de agua, aplica la mezcla en tu pelo después de acondicionarlo. No la retires, hazlo 1 vez por semana. 


Rosemary stimulates hair growth, strengthens the hair and helps solve the problem of thinning hair. Bonus, it smells lovely!

El romero estimula el crecimiento del cabello, lo fortalece y ayuda si tienes problemas de caída. Otra ventaja es que huele riquísimo!

Recipe: Mix 2 teaspoons of dry, crushed rosemary leaves in two cups of water (as if you were making tea). Massage this mixture into your hair and scalp and don't wash it out. / Mezcla dos cucharadas de hojas de romero echas pedacitos en dos tazas de agua (imagina que estas haciendo té). Masagea la mezcla en tu pelo y cuero cabelludo, no la retires. 


You've probably heard this before, but people repeat it over and over again because it's proven and true: healthy scalp = healthy hair. One of the worst offenders for your scalp is product build up. Maybe you don't really notice it, but all those styling sprays, conditioners and even your shampoo leave traces on your hair and scalp, which can lead to dullness over time. There are people who take it to extremes and skip them all together and only use baking soda to wash their hair, instead of regular shampoo. We recommend using this mixed with your shampoo for optimal results.

Probablemente ya has escuchado esto antes, pero la gente lo repite una y otra vez porque está comprobado que funciona: un cuero cabelludo sano = cabello sano. Una de las peores cosas para tu cuero cabelludo es la acumulación de productos; sprays, acondicionador y hasta tu shampoo deja huellas! Hay personas extremas que ocupan solamente bicarbonato en lugar del shampoo tradicional. Nosotras te recomendamos ocupar esta mezcla con tu shampoo regular para mejores resultados. 

Recipe: Mix 2 tablespoons of baking soda with a small amount of water and shampoo, until a thick paste forms. Massage this into your damp hair and rinse it out or let it sit 15 minutes for optimal results. Condition afterwards. Do this once a week or once every two weeks. / Mezcla dos cucharadas de bicarbonato en una pequeña cantidad de agua y shampoo, hasta que se forme una pasta espesa. Masajea la mezcla en tu cabello húmedo y luego retirala, o déjala reposar por 15 minutos para mejores resultados. Aplica acondicionador después. Haz esto una vez por semana o cada dos semanas. 


more is better: bracelets!

By now, unless you're Lilo on Mean Girls, you must have already heard the term arm party. We love the idea of wearing a zillion bracelets, first inspired by one of our favorite bloggers Leandra Medine aka The Man Repeller. However, we sometimes find it can be difficult to know how exactly to pile on that many baubles on our arms. Our main concerns: we want them to look good (the look can quickly go from chic to messy), and we don't want the look to be uncomfortable.

A menos que seas el personaje de Lindsay Lohan en Mean Girls, deben haber escuchado ya el término arm party. Nos encanta la idea de usar varias pulseras al mismo tiempo, inspirada por una de nuestras bloggers favoritas Leandra Medine aka The Man Repeller. El problema es que a veces se nos hace difícil saber exactamente cómo usar tantas cosas en nuestros brazos al mismo tiempo sin que se vea desordenado y sin que sea incómodo. 


To help you in throwing your own arm party, we leave you with this video featuring the hilarious Leandra, where she demonstrates how to master the look. Why wear one bracelet when you can wear 12?!

Para ayudarlas a hacer tu propio arm party, les compartimos este video con la chistosisima Leandra, en el que demuestra cómo lograr el look, porque por qué usar solo una pulsera, si podes usar 12?!


Leandra's Tips!

Bare it all:
Start your arm party with your bare wrists (remove your watch)
Comienza sin ninguna joya en tus brazos (quitate hasta el reloj)

Work from biggest to smallest: 
Start with your biggest bauble and work from there
Ponte la pulsera más grande y sigue hacia la más pequeña

Color coding: 
It looks less messy if you do a monochromatic look, for example keep everything metallic
El look se ve menos desordenado si usas pulseras de un solo color, por ejemplo mantén todo metálico

Brothers and sisters go together: 
The smaller and thinner the bauble, they look better if you pile them next to each other Entre más pequeña y delgada sea tu pulsera, se ve mejor si la agrupas junto a otras pulseras iguales o similares

The bigger the better: 
There's no max number to the bracelets you should wear, just pile them on as long as they feel comfortable
No hay un número máximo de braceletes que puedas usar a la vez, pontelos hasta donde te sientas cómoda


beauty shortcut: dry shampoo


How long does it take you to get ready in the morning? On a good day, if we manage to jump from bed quickly , we'd say we take anywhere between half an hour and 45 minutes. But there are those dreaded days when hitting the snooze button just once won't do. Maybe it's cloudy outside, or maybe we stayed up late watching Toddlers and Tiaras (guilty pleasure), or maybe it's monday and we just don't want to leave our bed. We want and need those extra 10 minutes of sleep. If there's a shortcut for our morning beauty routine to be had, we'll give it a shot. Which explains why we love dry shampoo so much: nothing makes limp hair look fresh and clean for another extra day.

Dry shampoos weren't available here at salons for ages, that's why we had to resort to stocking up when we or someone we know traveled anywhere near a Sephora. So when we heard from a friend and bloom reader (yay!) that dry shampoos are now available at the supermarket, we jumped for joy and did a happy dance! We were told that there are two brands available: Tresemme and Suave. We found the Suave version but there was no sign of Tresemme anywhere, so if anyone spots it, please let us now! Now, on to the review!

Product: Suave Professionals Dry Shampoo Spray
Rating: B+
Price: $6.00
Where to buy: Super Selectos
FYI: A can will probably last you anywhere between 3 weeks and a month, depends on how often you apply it and the length of your hair.

We tested out the Suave dry shampoo, and though we are happy that it's available for cheap, it's really not that great. The smell is nice and pretty fruity, sort of a mix between pineapples and lemons. It is also very strong, but you sort of get used to it because it's nice. People unaware that we had the shampoo on, commented that our hair smelled good. 

After applying it (we used it in the morning and after the gym), we did notice that our hair looked cleaner and bouncier. Beware, not to apply too much of the product. If your hair is dark, you will end up with white hair! If you go spray happy, you can just brush your hair and it will disappear. 

The veredict: We've kept on using this dry shampoo, probably not because we love it, but because it is a good option for the price. It's great for a quick fix. Will buy again!


Cuánto tiempo necesitas para arreglarte en las mañanas? En un buen día, si no nos tardamos mucho en salirnos de la cama, diríamos que entre 30 y 45 minutos. Pero están esos días terribles en que solo no nos podemos levantar, y necesitamos apretar snooze más de una vez. Tal vez anoche nos desvelamos viendo Toddlers and Tiaras, o el cielo está nublado o es lunes y no estamos listas para empezar la semana. Cada minuto es indispensable! Es por eso que recibimos con los brazos abiertos cualquier atajo en nuestra rutina de belleza, por lo que nos encanta el dry shampoo! 


Los dry shampoos no estaban disponibles en nuestro país, así que teníamos que esperar irnos de viaje o que algún conocido fuera a algún lugar con Sephora para que nos trajera un par de botes. Recientemente nos enteramos a través de una amiga que los dry shampoos AL FIN están disponibles en los supermercados, así que corrimos a buscarlos. Se supone que hay en existencia dos: uno Tresemme y uno Suave. Solamente encontramos el Suave, así que si alguien ve el otro, por favor avísenos!


Product: Suave Professionals Dry Shampoo Spray
Rating: B+
Price: $6.00
Where to buy: Super Selectos
FYI: Una lata te puede durar entre tres semanas y un mes, dependiendo de tu frecuencia de uso y el largo de tu pelo.


Probamos el dry shampoo Suave y aunque nos alegra que al fin esté disponible y a un bajo precio, es bueno pero no es excelente. Tiene un aroma cítrico, como una mezcla entre piñas y limones que aunque es rico, es bastante fuerte. Toma un rato acostumbrarse al olor, e incluso puede ser percibido por otros (recibimos buenos comentarios que nuestro pelo olía rico).

Lo ocupamos dos veces, una vez en la mañana y una vez inmediatamente después del gimnasio por las noches. Sí notamos que nuestro pelo se veía más limpió y con cuerpo. Advertencia para las que tienen cabello oscuro, no se apliquen mucho porque les puede dejar un residuo blanco. Si les pasa, solo cepillen su cabello y se quita fácilmente.  

El veredicto: Hemos seguido usando este dry shampoo (y lo seguiremos haciendo), tal vez no tanto porque nos encante, pero si es una buena opción para un fix rápido y a buen precio!


gifts for grads: friends edition


Graduations are coming up! Whether it's your significant other, cousin, brother/sister or a friend, or whether they're graduating from school or college, please we beg you PUT DOWN THAT COLOGNE/PERFUME! Don't even think about getting them a pen or a pair of earrings. All of those are never ok, unless they've been particularly requested by the graduate. Take a step away from the usual and get them something they'll actually use. Trust us, through our four years of college, never did we once step away from our bic pens to use that fancy fountain one our aunt/second cousin got us. We'll be posting throughout the week gifts for every occasion for every budget, because we want to make you look good :) 

Se acerca la temporada de graduaciones! Si conoces a alguien que se gradua, ya sea tu novio, primo, hermana, amiga y se están graduando del colegio o la u, te ROGAMOS por favor alejate de los perfumes! Ni se te ocurre regalarles una pluma/lapicero o un par de aritos. Todas esas opciones NO están bien, a menos que te las haya pedido directamente quién se gradua. Sal de lo usual y regalales algo que SI van a ocupar. Se los juramos que en nuestros cuatro años de u, jamás usamos ese lapicero Cross que nos regaló una tía (siempre usamos bics!). Vamos a estar posteando ideas de regalos para todos los presupuestos para ayudarte a quedar bien en esa ocasión tan especial :)


Treat her to a beauty day! Get her a gift certificate for a blowout and a mani-pedi at her favorite salon and give it to her in advance. She will be getting one anyway on graduation day, so let it be on you :)

Regalale un día de salón :) Te sugerimos un certificado de regalo que incluya lavado+secado/planchado+mani/pedi, y dáselo anticipadamente. En época de graduación no hacen falta las ocasiones en que tu amiga va a querer verse linda, así que al menos una que corra por tu cuenta!


A bottle of good booze, because all everyone wants to do before moving on with school, is party. So help them do it in style. There are great options at every price spoint: if you're feeling spendy, we recomend a bottle of Johny  Walker Black Label, Grey Goose Vodka or Zacapa Rum. If you're on a tighter budget,: try vodka (we like Finlandia), rum (Flor de Caña 12 or 7, nothing under these), or a six pack of their favorite imported beer they only buy twice a year. Don't do cheap whisky, it makes you look well, cheap. 

Qué es lo que cualquier persona que se va a graduar quiere hacer? Empatinarse! Así que ayudalos que lo hagan con estilo. Hay varias opciones de botellas según tu presupuesto. Para algo extra especial, te recomendamos una botella de Johny Walker Black Label, Vodka Grey Goose o Ron Zacapa 23 años. Si tu presupuesto es más ajustado, te recomendamos escoger una de tres categorías: vodka (Finlandia), ron (Flor de Caña 7 o 12 años, nada por debajo de estos!), o un six-pack de su cerveza importada favorita que solo se toma dos veces al año. 


Who doesn't like sweet things? Get them a box of cupcakes or macarons :) For cupcakes, we like De Las Gemelas in San Benito (look them up on facebook). Try to go in the morning, the best flavors sell out fast.

A quién no le gusta lo dulce? Regala una cajita de cupcakes o macarrones :) Para cupcakes, te recomendamos a De Las Gemelas en San Benito (búscalas en facebook). Para cualquiera de estas opciones es bueno comprarlos antes de medio día, los sabores más ricos se van rápido. 

must try this weekend: red-orange lips

We LOVE J.Crew catalogues. Seriously, we do a happy dance here at bloom once a month when it gets updated. The styling of each outfit is just so quirky and colorful! Some of them are a little too much for our taste (sneakers with a pencil skirt? no), but they're a great source of inspiration for how to put together colors and patterns for on and off duty dressing. The clothes aren't the only thing that's pretty and inspirational, we also love the beauty looks. The models are always styled in an effortless chic kind of way: tousled hair, understated eyes and red-orange lips. That lip color! We think that the lips are what tie everything together, it's what takes the look from messy to chic. So after months of debating whether or not to hop on the bold-lip bandwagon, we finally decided to give this look a try!

Nos ENCANTAN los catálogos de  J.Crew. No es mentira cuando les decimos que hacemos un bailecito de alegría cada mes que los actualizan en su página. Lo que más nos gusta es que son únicos para crear sus outfits: son la inspiración perfecta para aprender a combinar colores y estampados. Otro de los elementos que nos inspiran son los looks de belleza. Las modelos siempre están arregladas de manera sencilla pero chic: peinado ligeramente desordenado, ojos naturales, y labios rojos-anaranjados. El color de labios es en definitiva lo que unifica la ropa con el peinado, evita que la modelo se vea desordenada y la hace verse elegante. Así que después de meses de estar en ese estira-y-encoge de si probar o no probar este look, finalmente nos convencimos a darle una oportunidad! 

If this does not convince you of trying a new bold lip color, we don't know what will.


After hours of pouring over google and pinterest looking for the perfect lip color to suit all skin tones, we settled on two: MAC's Cremesheen in Vegas Bolt (splurge, $18, Siman) and Revlon's Colorburst Lip Butter in Tutti Frutti (steal, $6, Wal Mart). If you decide to try this trend remember to K.I.S.S.: Keep It Simple, Sweetie! Keep your eyemakeup to a minimum and let the lipstick do its job! Now on to the reviews:

Después de varias horas de buscar el color de labios perfecto para cualquier tono de piel en google y pinterest, finalmente nos decidimos por dos labiales: MAC Creemsheen en Vegas Bolt (inversión, $18, Simán), y Revlon Colorburst Lip Butter en Tutti Frutti (BBB*, $6, Wal Mart). Si se deciden a probar este look, les recomendamos mantener su maquillaje de ojos a un mínimo (sobre todo si es de día)
*BBB = bueno, bonito y barato :)


Rating: A+ for both!

Both lipsticks are great options, which one you buy depends on how bold you want your lips to go and your budget, you could buy either and get great results!

MAC's lipstick is very pigmented, a little will go a long way. We suggest not applying it straight from the tube, but instead, dap it on with your fingers. That way you can adjust how much color you want. We love that this color is bold, so you can take it from day to night by layering on more color. It has a subtle sheen to it once applied, but it can almost look matte after having it on for a while. A con of this lipstick is that it tends to dry out our lips a little, so we suggest you apply a layer of chapstick before putting it on.

Revlon's lip butter on the other hand, is very sheer. You can apply it straight from the tube, without even using a mirror and you'll be fine. This lipstick is great if you're looking to try this look in a more understated way. It has a lot of sheen to it, almost like those squeezable chapsticks (not the stick ones) but not quite as bold as lip gloss. However, if you like matte lips, this is not your option. A big plus of Revlon's lipstick is that it's not drying at all, so we recommend not wearing any chapstick under it. If you do, because of the sheerness of the lipstick, you'll wash out the color.


Nota: 10 para ambos!

Ambos lipsticks son buenísimas opciones, todo depende de que tan fuerte quieras tu color y cuanto estés dispuesta a gastar, puedes comprar cualquiera de los dos y tener excelentes resultados!

El labial MAC es pigmentado, un poquito de este se nota bastante. Les sugerimos no aplicarlo directamente del tubo, sino hacerlo con sus dedos. De esta manera pueden controlar mejor la magnitud del color, porque si es fuerte. El labial tiene muy poco brillo, así que si les gustan los labiales mate, pueden aplicar poco color o bajar el brillo con una servilleta. Una desventaja de este lipstick es que tiende a resecar los labios, así que les sugerimos ocupar chapstick debajo.

Por otro lado, el labial Revlon es ligeramente traslucido. Lo pueden aplicar directamente del tubo (¡sin necesidad de espejo!) sin tener miedo de verse como payasitas. Este lipstick es perfecto si están buscando un look más discreto. El labial tiene bastante brillo, casi como esos chapsticks de tubo apretable (aunque no tanto como un lipgloss). Así que si te gustan los labiales mate, esta NO es tu opción. Un gran plus de este lipstick es que no reseca los labios, es más, te recomendamos no ocupar chapstick debajo para que no diluyas el color. 


pinspiration: Pinterest Tools


Pinterest addicts this post is for you. Yes, you. Don't try to deny it, you know who you are. You, who bore your tech-challenged mom, boyfriend, brother, co-worker or pretty much anyone with ears with your incessant  rambling about your latest project. You know, those cute cupcakes, or that wrap bracelet. You, who have sat at your computer for hours planning your next birthday party, searching for a recipe for the perfect chocolate chip cookies, wishing you suddenly won the lottery to be able to buy a Celine luggage bag in every color, or 1,001 different ways to eat bacon. Here at bloom, we salute you! To make it easier for you to pin all the things, we will write every week about a different pinterest tool or site we love, that will make pinning even more addictive fun. If this scares you, step away from your computer right now. You have been warned. 

So, picture this: you're sitting there, sorting through your e-mails and you see that J. Crew has updated their catalog and want to pin it all to one of your style boards. But you see, you can't do that because you get that dreaded message box: "sorry, couldn't find any pinable images in this window". But YOU MUST pin those hot pink pants and that green shift! And no, you don't want to printscreen it and the upload it. If you're resourceful lazy like us, you must download Shotpin :) It's a Chrome browser extension that makes it easy for you to take a screenshot and pin it directly to any of your boards. Just as easy as using the pin it button! If you use another browser like firefox or safari, let us know in the comments and we'll google a great option for you. We recommend Shotpin because it's the one we use and works great. Happy pinning!

FOLLOW US ON PINTEREST HERE!

Pinterest-adictas, este post es para ustedes. Nos inspiramos en ustedes que hablan sin cesar de pinterest a su pobre mamá que apenas tiene celular, a su novio, hermano, compañero de trabajo o a quien tenga orejas para escucharlas. Que le cuentan emocionadas a sus amigas de los cupcakes de flores que hicieron o de esa pulsera de enrollar. Para ustedes que han estado sentadas por horas en la computadora planeando su cumpleaños, buscando la receta para las galletas perfectas, que quisieran ganarse la lotería para comprarse una cartera Celine en cada color del arcoiris, y que han descubierto 1,001 maneras de comer tocino. Acá en  bloom, les damos un aplauso! *aplausos* Para hacer de Pinterest una experiencia más divertida adictiva, empezando esta semana vamos a estar comentando nuestras páginas de internet y herramientas favoritas sobre el tema. ¡Esperamos les sirvan!

Así que, imagínense esto: están revisando su correo y se dan cuenta que ya está disponible el catálogo nuevo de J. Crew, se meten a la página y quieren pinearlo TODO a sus style boards. Pero NO, no se puede porque tu browser te da el odioso mensaje: "sorry, couldn't find any pinable images in this window". Simplemente la vida no puede seguir si no pineas esos pantalones rosados y ese vestido verde neon! Sinceramente, te da demasiada hueva dar printscreen y subir el pin manualmente. Entonces, ¿qué hacer? Nosotras te recomendamos Shotpin :) Es una extensión del browser Google Chrome, que te permite tomar un screenshot o impresión de tu pantalla y subir directamente a cualquiera de tus boards, como que si estuvieras usando el pin-it-button. Shotpin está disponible solamente para Chrome, así que si usas safari o firefox, dejanos un comment para buscarte una buena alternativa, happy pinning! :)

DIY arm party

Nota: Para leer la versión en español de este post, sigue bajando!


We want to cordially invite you to your very own arm party! Here at bloom we share a love of piling on different kinds of bracelets… the more, the better! That's why we want to show you how to make a very cute wrap bracelet to add to your collection. It's so simple you'll want to make lots of them and stack them all along your arm (trust us, we know, we can't stop). Follow the tutorial step by step and have fun planning your own arm party :)

You’ll need (for a triple wrap-bracelet):
 
·         A pair of scissors
·         ½ yard of ball chain
·         50 inches of 1.5mm waxed linen cord
·         45 inches of waxed linen cord (thinner than the other cord)
·         A hex nut

Please keep in mind, that these measurements are not set in stone. You will need more or less materials, depending on your wrist and how loose you want the bracelet, but these are the ones that we used. 

  1. Take the thicker cord and fold in half to form a loop. How big should the loop be? Use your hex nut to measure, make sure that it barely fits through it, but that it's not too big or you won't have a clasp.
  2. To secure the thin cord and start the bracelet, make a knot at the base of the loop and wrap it around at least 4-5 times, working downwards in the opposite direction.
  3. Place the ball chain along the thick cord (the one you previously folded), with the end of the chain meeting the end of the wrap, and then start wrapping the cord around it as tight as you can. 
  4. Continue wrapping until the end of the ball chain is reached, then continue wrapping 4-5 times and tie a knot will the three strands.
  5. Thread the hex nut through the strands and tie a second knot tightly.
  6. Trim the ends with scissors and your wrap bracelet is finished!
Woo hoo! It's a party in your arms, all day long! Experiment using other kinds of beads, just remove the thread that they come in and use nylon to make it sturdier. Check out the end of this post for our Shopping Guide on where to buy the materials.


A todas nos gusta poner diferentes tipos de pulseras, una encima de otra... cuanto más, mejor (sólo en este caso en particular)! Es por eso que queremos mostrarles cómo hacer una pulsera de vueltas muy linda y diferente para añadir a tu colección. Es tan fácil que no vas a poder parar de hacerlas hasta tener de todos colores! (se los decimos por experiencia) Seguí el tutorial paso a paso y pasa un buen rato diseñando tu propio “arm party”!

Vas a necesitar (para una pulsera de tres vueltas):
 Un par de tijeras
• ½ yarda cadena de bolitas
• 50 pulgadas de cuerda encerada de 1.5mm
• 45 pulgadas de cuerda encerada (más delgada que la otra cuerda)
• una tuerca 
Toma en cuenta que las longitudes puede variar dependiendo del tamaño de tu muñeca y que tan apretada queras tu pulsera, pero para darte una idea, estas fueron las que nosotras usamos.

  1. Toma la cuerda más gruesa  y doblala por la mitad. El doblez va a formar una especie de ojal en el que tiene que caber la tuerca, pues este servirá como broche.
  2. Haz un nudo con la cuerda delgada abajo del ojal. Dale vuelta a la cuerda más delgada alrededor de la base del ojal unas 4 a 5 veces para asegurar el nudo y empezar la pulsera
  3. Coloca la cadena de bolitas a lo largo de la cuerda más gruesa (la que ya doblaste) y al mismo tiempo enrolla la delgada alrededor de la cadena de bolitas y la cuerda gruesa. Las vueltas tienen que ser lo más ajustadas posible.
  4. Continua dándole vueltas a la cadena de bolitas hasta llegar a la punta. Una vez terminada, dale unas 4-5 vueltas más y haz un nudo con las puntas de las tres cuerdas.
  5. Enhebra la tuerca en las tres puntas de cuerda y después haz un segundo nudo lo más apretado posible
  6. Recorta con tijeras las puntitas que sobran después del nudo y tu pulsera está lista :)
Te aconsejamos experimentar con otros tipos de cadena y varios colores de cuerdas para que podas diseñar diferentes tipos de pulseras. Nosotras hicimos una con cuentas de piedras, solo sacalas del hilo en el que vienen y enhebralas en nylon para que duren y no se ropa la pulsera. 


Shopping Guide:
  • Cadena de bolitas: Freund, $1-$2 por yarda, dependiendo el grosor
  • Tuercas: Freund, $0.08 cada una
  • Cuerda: D'Perlas en Centro Comercial las Azaleas, $1 por 14 yardas
  • Nylon: D'Perlas en Centro Comercial las Azaleas, $1 por paquete


our FIRST week in pictures


Si no nos siguen en twitter, les compartimos nuestra primera semana online: organizamos una piñata, shopping finds y postres riquísimos :)

In case you're not following us on twitter or missed something, we break down our first week as bloom: we organized a little girl's birthday party, shopping finds and some delicious treats :)

Twitter: @bloom503

MUST TRY THIS WEEKEND

Se nos viene encima el Día de la Madre y por eso en bloom vamos a pasar el finde haciendo planes para que nuestra mami tenga el mejor día del año! Les dejamos una idea de regalo para mamá (P.S. está RIQUISIMA) ¡Que tengan un feliz fin de semana!

Mother's Day is coming up this thursday, so we're spending the weekend making plans so that our mom will have THE best day of the year. Here's an idea to try, and there's fun in it for you too for test-driving it. Have a great weekend!


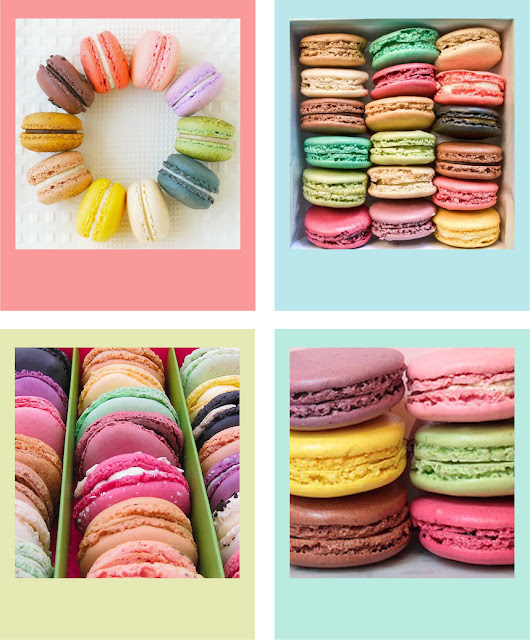
MACARONES FRANCESES / FRENCH MACARONS

Últimamente los cupcakes están por todas partes, y aunque son lindos, tu mami se merece algo fuera de lo común y especial. Por eso, te recomendamos le regales una caja de macarons franceses. Los macarons son galletas de almendra en forma de sandwich rellenas de crema de sabores o jalea. Te garantizamos que no te vas a poder comer solo uno! Los recomendamos como regalo para tu mami porque no solo saben rico, sino que son lindísimos! 

Los podes conseguir en sabores frambuesa ganache, limón, chocolate oscuro, pistacho, coco y chocolate blanco. Vienen en caja o individuales en cualquier Le Croissant (nosotras hemos probado Multiplaza y Escalón, y nuestros favoritos son el de chocolate blanco y el de chocolate oscuro).

Forget cupcakes! Macarons are the perfect dessert for mom. Macarons are a french cream filled sandwich cookie made of almond flour. It will fill you up with warm fuzzy happiness after one bite, guaranteed! They make a great gift because of all the pretty colors they come in. 

You can get them in lemon, dark chocolate, white chocolate, pistachio, coconut and raspberry ganache flavors. They come boxed at any Le Croissant (we've tried them at Multiplaza and Escalón and highly recommend the white chocolate and dark chocolate ones). 
Related Posts Plugin for WordPress, Blogger...