
When I was in high school I took chemistry and every single time we did an experiment, I would mix everything I could get my hands on, even those we weren't supposed to combine. Nothing special ever really happened aside from bubbles and changes in color, but I loved the thrill. That's why when all of those mentos and diet coke videos started popping up on youtube, I knew I had to do it. It's been a while since I've read anything that called to my inner scientist, until I read about soda cakes. It works like this: mix 1 boxed cake mix (any kind) + 1 can soda = DIET cake. No kidding. It's diet because there are no oils, fats nor eggs added to it IF you use sparkling water or diet soda.
I tried mine using sparkling water and it worked perfectly! The cake is super light and fluffy and it tastes just like a normal cake. Follow the same cooking times and temperatures as stated on the box, the batter works great for both cakes and cupcakes. A tip, spray your baking tin with cooking spray and/or line it with parchment paper so that the cake doesn't stick. I haven't tried this, but I read online that it tastes really good if you try one white cake mix with strawberry or lemon soda. I have my eye on trying this with a blood orange Pellegrino.

Cuando estaba en el colegio, teníamos clase de química y cada vez que hacíamos un experimento, tenía mezclar todas las cosas para ver si pasaba algo. La verdad que nunca pasó nada extraordinario, solamente un par de burbujas y cambios de color, pero me encantaba hacerlo. Como me encanta la travesura siempre ando buscando con qué experimentar, y este pastel de gaseosa me sonó perfecto! Si mezclas 1 caja de mezcla de pastel + 1 gaseosa = pastel. Se supone que es de dieta si se usa agua mineral o diet cualquier cosa, ya que no lleva ni aceites, grasas ni huevos.
Yo usé agua mineral para mi pastel, y quedó con una textura super light y esponjosa y el sabor es idéntico al de pastel hecho con grasa. Un tip, hay que engrasar bien la lata para hornear para que no se pegue el pastel (yo ocupé un spray). No lo he intentado, pero leí que sabe muy rico si se mezcla una gaseosa de fresa o limón con una caja de white cake mix. Quiero intentarlo con las Pellegrino de blood orange que he visto en el super!
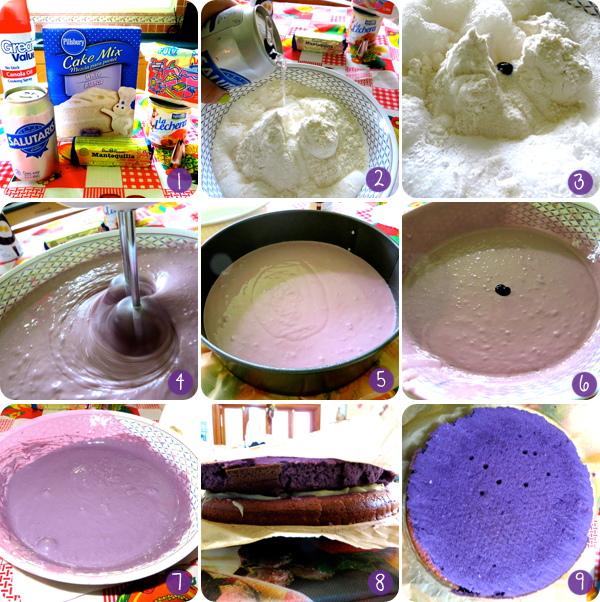
1. Ingredients: Boxed cake mix (white or vanilla), can of mineral water, food coloring, cooking spray, filling of your choice, frosting of your choice // Mezcla de pastel de caja (blanca o vainilla), lata de agua mineral, colorante en gel, spray de cocina, relleno y turrón de tu elección
2. + 3. Mix together the cake mix + soda + drops of food coloring // Mezcla el agua mineral con el mix de pastel y unas gotas de colorante
4. + 5. Once you're happy with the color of your batter, pour half of it into your cake pan. Don't forget to grease it! Bake it according to the directions on the box // Vierte la mitad de la mezcla en un molde engrasado y horneala de acuerdo a las instrucciones en la caja
6. + 7. Pour more drops of food coloring into the remaining batter, mix it well and bake it // Agrega más gotitas de colorante, mezclala bien y hornéala
8. Once the cake layers are cool, fill them (I used condensed milk and pastry creme) and stack them. If they're still warm and you do this, they might crumble // Una vez las capas estén frías, rellenalas (yo ocupé leche condensada y crema pastelera) y ponlas una sobre otra. Si haces esto con las capas calientes, probablemente se quiebren y el relleno se derrita
9. You're now ready to decorate your cake! // El pastel está listo para ser decorado!

The Inspiration!
As for the decorating of the cake, I'm in love with the rose cakes Amanda from I Am Baker shows on her blog. She recently posted a how-to video (check it out HERE). I tried it and it's easy, the trick is the tip you use. The bigger the tip, the better. I used a 4 tip I bought at Pimi, but I think it was too small so the roses didn't come out perfectly, but I still loved the look! Check out the photos for more tips and if you have any questions, email me at lifestyle503@gmail.com Happy baking! :)
A shout out to my lovely assistant, aka the boyfriend, for taking all the pictures for this post. He ate about half the cake and loved it, and he's not much of a dessert guy so I think it was a success!
Para decorar el pastel: Estoy enamorada de los pasteles de rosas que hace Amanda en su blog I Am Baker. Hace poco posteo un tutorial sobre cómo hacer las rosas y es super fácil, el truco está en ocupar una punta de duya lo más grande posible. Yo compré mi punta en Pimi (tamaño 4) pero creo que resultó ser demasiado pequeña para las rosas que quería. Les recomiendo comprar el siguiente tamaño, vale $1.45 cada punta. Pueden ver las fotos para más tips y si deciden hacer el pastel y tienen preguntas, me pueden escribir a lifestyle503@gmail.com. Happy baking! :)
Un saludo especial para mi lindo asistente, aka el novio, por tomar todas las fotos para este post. Se comió la mitad del pastel de una sentada, y como casi no le gustan los postres considero que fue un éxito!

1. + 2. Cover the cake with a light layer of frosting // Cubre el pastel con una capa de turrón
3. + 4. + 5. Put the remaining frosting in the bag, use a glass to do this, it helps a lot // Pon el turrón sobrante en la duya, usa un vaso para esto, ayuda mucho!
6. Begin frosting! Start from the inside using a large open star tip. Check out the tutorial HERE // Comienza a decorar! Usa una punta de duya de estrella grande, haz circulos comenzando desde el centro. Si necesitas ayuda mira este video!
7. + 8. The view from the top! // El pastel desde arriba
9. A peek into the purple ombre layers // Una mirada a las capas de pastel moradas
I used this recipe for the frosting, substituting the lard for butter. You can also buy the already made kind, just make sure the can says WHIPPED. To make it stiffer and good for decorating, mix in a 1 pound bag of confectioners sugar.
Yo usé esta receta para el turrón, sustituyendo la manteca por mantequilla. Si quieren un camino más fácil, compren del turrón de supermercado y mezclalo con una bolsa de 1 libra de azúcar glass. Hay que fijarse que la lata diga WHIPPED, sino será demasiado cremoso y las flores no mantendran su forma.
No comments:
Post a Comment