Showing posts with label tutorials. Show all posts

be happy!

My bedroom is currently undergoing a budget renovation. It's actually been that way for most of 2012, and it's taking so long because I only buy materials for a project every time I get paid. Bonus, it's also been an exercise in will power. The three biggest problems I've found are: 

1. Finding storage space that won't break the bank
2. Sorting through my things and deciding what to keep, what to sell and what to give away
3. Finding budget friendly ways to decorate and make my room my own


One of the biggest and by far most dramatic projects I've tackled was painting the room a different color. I did it all myself, because I splurged on paint so I had no money left to hire someone to do the painting for me. Plus, if I had an extra $100 lying around, I'd probably save it or buy shoes. My motto: Always DIY it if it can be done for cheaper. Except washing my car, I hate doing that. The whole paint job took me about a week, and not even cross-fit has made my arms hurt so bad. But it was so worth it. 

I love that my room now had bright glossy walls, but I still felt that there was something missing. I set my sights on a wall gallery, so I asked at my local hardware store how expensive it would be to frame stuff, and every frame ranged in price from $15 to $45. So, 10 photos * about $30 each = NEVER IN A MILLION YEARS. Remembering my motto, I turned to Pinterest for inspiration. I found a story  The Glitter Guide did on the home of blogger Katie Rogers from Paper Fashion, which featured photos hung on the walls using inexpensive japanese washi tape (fancy name for tirro). 


THE HOW TO:

One of my favorite Pinterest boards is my be happy! board, where I pin inspirational and funny quotes.

1. I chose my favorite ones,
2. arranged them in tabloids using photoshop,
3. printed them out in cardstock**,
4. cut them up and hung them using double stick tape, and accenting some with yellow washi tape I bought at a hardware store.

For under $15 (the cost of ONE frame), I now have a whole gallery :)


**If you don't have photoshop, all printers have graphic designers who will arrange the images for you.

DIY Monday: Cake Stand!


Hi everyone :) Sorry I've been a little absent from the blog, but my day job has been keeping me busy and my computer broke down! I've been a little bit of a victim of Murphy's law lately, but whatevs.. I've you've got a pinterest account, you must have noticed by now a lot of random pins featuring lovely dessert tables. Most of them are for children's or bachelorette parties, and while I don't have kids nor am getting married yet, that hasn't stopped me from wishing I had a cake stand, aka an uncomitted girl's dessert table. If I can't have an entire table, at least I'll have a cute place to put my weekly cupcake. 

This reminds me of a Sex and the City episode where Carrie so wisely points out "Think about it. If you are single, after graduation there isn’t one occasion where people celebrate you … Hallmark doesn’t make a “congratulations, you didn’t marry the wrong guy" card. And where’s the flatware for going on vacation alone?" Albeit we do celebrate birthdays every year, we only get one tiny celebration a year?! So join me and make your own cake stand and have some cake and celebrate "I am fabulous" day! :) 

(Boyfriends, husbands and kids welcome but not required) 

Sorry, but I had no cake this weekend to top it off


Materials: 
1 candle stick 
1 cute plate 
Glue gun 

It's a no brainer to make, you just take your gun and glue your candle stick to the back of your plate. You have to be somewhat careful when handling it, because the glue gets hard and breaks with time, but it's not like you use a cake stand every day, so it should last you a while. And if it breaks, you just take your trusty glue gun and put it back together again, it's no Humpty Dumpty!

I bought all my materials at a hardware store (Vidri) for less than $10. Beats the ridiculous prices of over $35 I found for cake stands at our local shops and online.

Sunday must reads!


So, that was fast. I really can't believe it's effing july. In honor of having survived the first six months of 2012, I've decided that today I'm staying in bed and having nutella. Everything is better with nutella. 

Because I'm not tired of these yet, here are two more top knot tutorials!

The cutest hair cut gone wrong...

The BEST cookie baking tip I've learned this year

Here's a cute dog for you, like a sir

In this heat, I've been craving ice cream sandwiches!

For the men in your life, the rules to always being a gentleman

MORE nutella! This time, in cups.

Have a great july! :)

party planning: bridal shower

Like I told you on thursday, I've been plenty busy making decorations for a friend's bridal shower. The party was yesterday and I loved how it turned out. The theme was pink, so I used several shades of pink and red paper to make the decor. I especially loved the pinwheels and flowers, all Pinterest inspired. I posted all the tutorials I used on my party planning board, in case you want to try any of them for your next party! I leave you with my fave pics of the shower, and if you want decorations for your next party, you can contact me and I'll happily work out something with you :)

Como les comentaba el jueves, he estado super ocupada haciendo las decoraciones para el te de bodas de una amiga. La fiesta fue ayer y me encantó cómo quedó el salón. El tema era rosado, así que ocupé varios tonos de papel en rosado y rojo para hacer als decoraciones. Me encantaron especialmente los pinwheels y las flores, todas inspiradas en Pinterest. He subido los tutorials que ocupé en mi party planning board, en caso de que quieran usarlos para su siguiente fiesta! Las dejo con mis fotos favoritas del té, y en caso quieran decoraciones para su siguiente fiesta, no duden en contactarme y con gusto puedo trabajar en algo para ustedes :)


I want long hair!


One of my favorite websites for everything beauty and fashion is without question Refinery 29. I love that recently they're all about fashion, beauty and DIY tutorials. I'm especially in love with all of the hair ideas they've been featuring recently, too bad that most of them are for long haired girls only. I leave you with my favorite feature, where they show how to create 8 gorgeous updos (top knots and braids, woohoo!) perfect for summer. Some of them look like they might require a little bit of practice and elbow grease, but the results look well worth the effort! Check them all out here!


Una de mis páginas favoritas para moda y belleza es definitivamente Refinery 29. Me encanta que últimamente han subido muchos tutoriales sobre moda, belleza y manualidades. Estoy especialmente enamorada de todas las ideas para peinados que han subido recientemente, lástima que la mayoría solo funcionan si tenes el pelo largo. Las dejo con mi noticia favorita, donde muestran como crear 8 peinados  lindísimos (con trenzas y moños!), perfectos para nestro clima. Parece que algunos requieren un poco de práctica y fuerza de brazos, pero creo que los resultados valen la pena! Véanlos todos aquí!

sugar rush: rose cake

When I was in high school I took chemistry and every single time we did an experiment, I would mix everything I could get my hands on, even those we weren't supposed to combine. Nothing special ever really happened aside from bubbles and changes in color, but I loved the thrill. That's why when all of those mentos and diet coke videos started popping up on youtube, I knew I had to do it. It's been a while since I've read anything that  called to my inner scientist, until I read about soda cakes. It works like this: mix 1 boxed cake mix (any kind) + 1 can soda = DIET cake. No kidding. It's diet because there are no oils, fats nor eggs added to it IF you use sparkling water or diet soda. 

I tried mine using sparkling water and it worked perfectly! The cake is super light and fluffy and it tastes just like a normal cake. Follow the same cooking times and temperatures as stated on the box, the batter works great for both cakes and cupcakes. A tip, spray your baking tin with cooking spray and/or line it with parchment paper so that the cake doesn't stick. I haven't tried this, but I read online that it tastes really good if you try one white cake mix with strawberry or lemon soda. I have my eye on trying this with a blood orange Pellegrino.


Cuando estaba en el colegio, teníamos clase de química y cada vez que hacíamos un experimento, tenía mezclar todas las cosas para ver si pasaba algo. La verdad que nunca pasó nada extraordinario, solamente un par de burbujas y cambios de color, pero me encantaba hacerlo. Como me encanta la travesura siempre ando buscando con qué experimentar, y este pastel de gaseosa me sonó perfecto! Si mezclas 1 caja de mezcla de pastel + 1 gaseosa = pastel. Se supone que es de dieta si se usa agua mineral o diet cualquier cosa, ya que no lleva ni aceites, grasas ni huevos. 

Yo usé agua mineral para mi pastel, y quedó con una textura super light y esponjosa y el sabor es idéntico al de pastel hecho con grasa. Un tip, hay que engrasar bien la lata para hornear para que no se pegue el pastel (yo ocupé un spray). No lo he intentado, pero leí que sabe muy rico si se mezcla una gaseosa de fresa o limón con una caja de white cake mix. Quiero intentarlo con las Pellegrino de blood orange que he visto en el super!


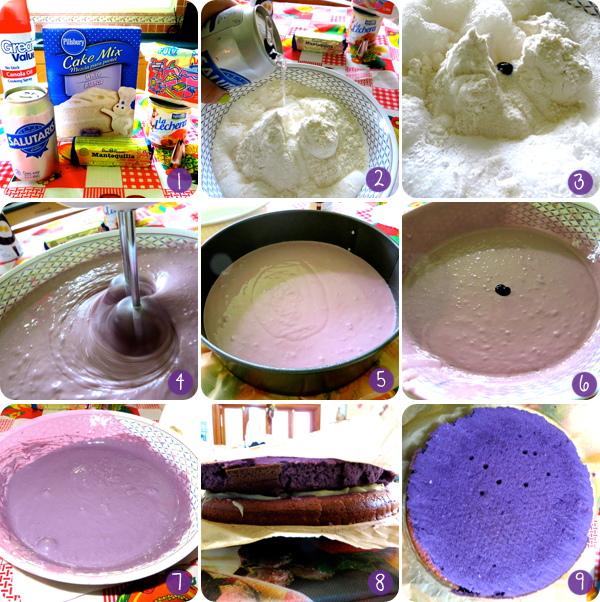
1. Ingredients: Boxed cake mix (white or vanilla), can of mineral water, food coloring, cooking spray, filling of your choice, frosting of your choice // Mezcla de pastel de caja (blanca o vainilla), lata de agua mineral, colorante en gel, spray de cocina, relleno y turrón de tu elección
2. + 3. Mix together the cake mix + soda + drops of food coloring // Mezcla el agua mineral con el mix de pastel y unas gotas de colorante
4. + 5. Once you're happy with the color of your batter, pour half of it into your cake pan. Don't forget to grease it! Bake it according to the directions on the box // Vierte la mitad de la mezcla en un molde engrasado y horneala de acuerdo a las instrucciones en la caja
6. + 7. Pour more drops of food coloring into the remaining batter, mix it well and bake it // Agrega más gotitas de colorante, mezclala bien y hornéala
8. Once the cake layers are cool, fill them (I used condensed milk and pastry creme) and stack them. If they're still warm and you do this, they might crumble // Una vez las capas estén frías, rellenalas (yo ocupé leche condensada y crema pastelera) y ponlas una sobre otra. Si haces esto con las capas calientes, probablemente se quiebren y el relleno se derrita
9. You're now ready to decorate your cake! // El pastel está listo para ser decorado!


The Inspiration!


As for the decorating of the cake, I'm in love with the rose cakes Amanda from I Am Baker shows on her blog. She recently posted a how-to video (check it out HERE). I tried it and it's easy, the trick is the tip you use. The bigger the tip, the better. I used a 4 tip I bought at Pimi, but I think it was too small so the roses didn't come out perfectly, but I still loved the look! Check out the photos for more tips and if you have any questions, email me at lifestyle503@gmail.com Happy baking! :)

A shout out to my lovely assistant, aka the boyfriend, for taking all the pictures for this post. He ate about half the cake and loved it, and he's not much of a dessert guy so I think it was a success!

Para decorar el pastel: Estoy enamorada de los pasteles de rosas que hace Amanda en su blog I Am Baker. Hace poco posteo un tutorial sobre cómo hacer las rosas y es super fácil, el truco está en ocupar una punta de duya lo más grande posible. Yo compré mi punta en Pimi (tamaño 4) pero creo que resultó ser demasiado pequeña para las rosas que quería. Les recomiendo comprar el siguiente tamaño, vale $1.45 cada punta. Pueden ver las fotos para más tips y si deciden hacer el pastel y tienen preguntas, me pueden escribir a lifestyle503@gmail.com. Happy baking! :)

Un saludo especial para mi lindo asistente, aka el novio, por tomar todas las fotos para este post. Se comió la mitad del pastel de una sentada, y como casi no le gustan los postres considero que fue un éxito!


1. + 2. Cover the cake with a light layer of frosting // Cubre el pastel con una capa de turrón
3. + 4. + 5. Put the remaining frosting in the bag, use a glass to do this, it helps a lot // Pon el turrón sobrante en la duya, usa un vaso para esto, ayuda mucho!
6. Begin frosting! Start from the inside using a large open star tip. Check out the tutorial HERE // Comienza a decorar! Usa una punta de duya de estrella grande, haz circulos comenzando desde el centro. Si necesitas ayuda mira este video!
7. + 8. The view from the top! // El pastel desde arriba
9. A peek into the purple ombre layers // Una mirada a las capas de pastel moradas

I used this recipe for the frosting, substituting the lard for butter. You can also buy the already made kind, just make sure the can says WHIPPED. To make it stiffer and good for decorating, mix in a 1 pound bag of confectioners sugar. 

Yo usé esta receta para el turrón, sustituyendo la manteca por mantequilla. Si quieren un camino más fácil, compren del turrón de supermercado y mezclalo con una bolsa de 1 libra de azúcar glass. Hay que fijarse que la lata diga WHIPPED, sino será demasiado cremoso y las flores no mantendran su forma. 

buns, buns, buns!

This damn humidity. Channeling Monica Geller in Barbados without question. I love the sock bun for this weather, but I don't want to look the same every day! The people over at Refinery 29 feel the same way, and teamed up with hairstylist to help take the ordinary bun to the next level. Here are my favorite two, with instructions and our tips for getting the look!

Ya no soporto esta humedad y pensar que faltan meses para que se termine. Si pensaba que tenía pelo de Mónica Geller en Barbados, deberían ver mi pelo ahora si lo dejo secarse al aire! Como les comentaba, me encanta el sock bun para este clima, pero no quiero aburrirme y verme igual todos los días. En Refinery 29 comparten este sentimiento, y se unieron con una estilista para sacar de lo monótono al moño ordinario. Las dejo con mis dos peinados favoritos con instrucciones y tips de mi parte!


Disclaimer: This will probably make your arms hurt a bit, but bear with it, you know what they say: no pain, no gain! / Esto probablemente haga que les duelan los brazos un poco, pero ya saben lo que dicen: la belleza cuesta!


Divide your hair into two equal sections, one in the front and one in the back. Secure the front section into a pony tail. Flip your head down, and finger comb your hair forward. 


Divide tu cabello en dos secciones iguales, una adelante y otra atrás. Pon la adelante en una cola. Tira tu cabeza hacia el frente, y peina tu cabello hacia adelanta con los dedos.


Do a dutch braid (or inside-out french braid). The technique is the same, but instead of looping pieces over each other, you loop them under. If you need extra help on how to do this, here's this video.


Haz una trenza francesa inversa, la técnica es la misma, pero en lugar de enlazar las secciones por arriba, pásalas una debajo de la otra. Si necesitas ayuda con esto, mira este video.


Once at the top, grab the hair from the front section and combine it into one ponytail on top of the head. Secure the ponytail with an elastic.


Cuando llegues a la parte de arriba de tu cabeza, agarra la sección de pelo delantera y combínala con el sobrante de la trenza. Haz una cola en la parte de arriba de tu cabeza.


Here you have two options: you can either pull up the ponytail, then loop it down and wrap the remaining hair around it and secure it with bobby pins; or you can sock bun it and you're done!

Tip: if your hair is cut in layers, use hair spray to secure the loose ends to your head.


Acá tienes dos opciones: una es jalar la cola hacia arriba luego hacia abajo y enrollar el cabello sobrante alrededor, o puedes hacer un sock bun y estas lista!

Tip: si tu cabello está cortado en capas, usa spray de pelo para asegurarlo a tu cabeza.


Side part your hair, easy.


Hazte un camino de lado, facilísimo!


Pull all your hair to one side behind your ear and split it into two equal sections.


Haz todo to cabello a un lado detrás de tu oreja y divídelo en dos secciones iguales.


Tie the two pieces into a hair knot and pull it tight. If your hair is long enough, do this again. Tip: if your hair is layered, run some mousse or pomade through it before knotting it to help it stick together. 


Agarra las dos secciones y haz un nudo apretado con ellas. Si tu pelo es lo suficientemente largo, hazlo de nuevo. Tip: si tienes capas, ponte mousse o pomada en el pelo antes de hacer el nudo para que se mantenga junto.


Grab the loose ends and tuck them under the sides of the knot, secure them with bobby pins. Pull at the sides of the knot to make them look messy.


Agarra las puntas y mételas debajo de los lados del nudo, asegúralas con ganchitos. Desordena un poco los lados del nudo.


Hairspray the bun and you're done! 

Ponte spray de pelo y estás lista!


Check out the other two buns here!

gifts for grads: friends edition


Graduations are coming up! Whether it's your significant other, cousin, brother/sister or a friend, or whether they're graduating from school or college, please we beg you PUT DOWN THAT COLOGNE/PERFUME! Don't even think about getting them a pen or a pair of earrings. All of those are never ok, unless they've been particularly requested by the graduate. Take a step away from the usual and get them something they'll actually use. Trust us, through our four years of college, never did we once step away from our bic pens to use that fancy fountain one our aunt/second cousin got us. We'll be posting throughout the week gifts for every occasion for every budget, because we want to make you look good :) 

Se acerca la temporada de graduaciones! Si conoces a alguien que se gradua, ya sea tu novio, primo, hermana, amiga y se están graduando del colegio o la u, te ROGAMOS por favor alejate de los perfumes! Ni se te ocurre regalarles una pluma/lapicero o un par de aritos. Todas esas opciones NO están bien, a menos que te las haya pedido directamente quién se gradua. Sal de lo usual y regalales algo que SI van a ocupar. Se los juramos que en nuestros cuatro años de u, jamás usamos ese lapicero Cross que nos regaló una tía (siempre usamos bics!). Vamos a estar posteando ideas de regalos para todos los presupuestos para ayudarte a quedar bien en esa ocasión tan especial :)


Treat her to a beauty day! Get her a gift certificate for a blowout and a mani-pedi at her favorite salon and give it to her in advance. She will be getting one anyway on graduation day, so let it be on you :)

Regalale un día de salón :) Te sugerimos un certificado de regalo que incluya lavado+secado/planchado+mani/pedi, y dáselo anticipadamente. En época de graduación no hacen falta las ocasiones en que tu amiga va a querer verse linda, así que al menos una que corra por tu cuenta!


A bottle of good booze, because all everyone wants to do before moving on with school, is party. So help them do it in style. There are great options at every price spoint: if you're feeling spendy, we recomend a bottle of Johny  Walker Black Label, Grey Goose Vodka or Zacapa Rum. If you're on a tighter budget,: try vodka (we like Finlandia), rum (Flor de Caña 12 or 7, nothing under these), or a six pack of their favorite imported beer they only buy twice a year. Don't do cheap whisky, it makes you look well, cheap. 

Qué es lo que cualquier persona que se va a graduar quiere hacer? Empatinarse! Así que ayudalos que lo hagan con estilo. Hay varias opciones de botellas según tu presupuesto. Para algo extra especial, te recomendamos una botella de Johny Walker Black Label, Vodka Grey Goose o Ron Zacapa 23 años. Si tu presupuesto es más ajustado, te recomendamos escoger una de tres categorías: vodka (Finlandia), ron (Flor de Caña 7 o 12 años, nada por debajo de estos!), o un six-pack de su cerveza importada favorita que solo se toma dos veces al año. 


Who doesn't like sweet things? Get them a box of cupcakes or macarons :) For cupcakes, we like De Las Gemelas in San Benito (look them up on facebook). Try to go in the morning, the best flavors sell out fast.

A quién no le gusta lo dulce? Regala una cajita de cupcakes o macarrones :) Para cupcakes, te recomendamos a De Las Gemelas en San Benito (búscalas en facebook). Para cualquiera de estas opciones es bueno comprarlos antes de medio día, los sabores más ricos se van rápido. 

summer hair: fishtail braids


We don't know about you, but we are melting. Yesterday felt like it must have been the hottest day of the year. And the worst part, it's not only hot, it's also humid. It almost feels like you are drinking the air instead of breathing it, this is horrible. Our closet for a room full of A/C! You know what else we also don't like about this weather? The effect it has on our hair. "It's the humidity!" we say, like helpless Monica Gellers. It doesn't matter if we blow dry it or flat iron it, it still acts up and frizzes and poufs. Our hair just won't behave. We love wearing our hair down, but honestly this just isn't the weather for it. So instead of wearing the hair in your basic pony tail, we suggest you try our sock bun tutorial, or you braid it! We love braids, they are so romantic, especially fish tail braids. We scoured through youtube and found the perfect tutorial to show you the technique. If you have short hair, we suggest you try the version shown in the video with the braid at the crown (sorry, we aren't fans of those fishtail pigtails, but the technique is good). If you have long hair, well the sky is the limit for you! We love how it looks when worn to the side. Happy sunday, and fight that humidity!

Nos.estamos.derritiendo. Ayer debió haber sido el día más caliente del año, era insportable caminar bajo el sol. La peor parte es que no solo hace calor, sino que además está humedo. Se siente como que si deberiamos de estarnos tomando el aire en lugar de respirarlo. NUESTRO CLOSET POR UN CUARTO CON AIRE ACONDICIONADO! Algo más que no nos gusta de este clima? El efecto que tiene en nuestro pelo. Se acuerdan del capítulo de Friends en que van a las Bahamas? "It's the humidity!" pensamos, igual que Monica Geller. No importa si lo secamos o lo planchamos, el frizz siempre gana y deja nuestro pelo esponjoso. Nos encanta usarlo suelto, pero honestamente en este clima no vale la pena. Así que si estás igual que nosotras, en lugar de solo hacerte una cola, te sugerimos nuestro sock bun tutorial, o una trenza! Nos encantan las trenzas, y este día te vamos a mostrar cómo hacer una fishtail braid. Buscamos todo youtube para encontrar el tutorial perfecto para enseñarte la técnica. Si tenes el cabello corto, te recomendamos mucho la versión del video de una trenza pequeña al lado (lo sentimos, pero no somos fans de las dos colitas-trenza). Si tenes el cabello largo, pues volvete loca! Nos encanta el look con una sola trenza a un lado. Les deseamos un feliz domingo y luchemos contra la humedad!


must try this weekend: red-orange lips

We LOVE J.Crew catalogues. Seriously, we do a happy dance here at bloom once a month when it gets updated. The styling of each outfit is just so quirky and colorful! Some of them are a little too much for our taste (sneakers with a pencil skirt? no), but they're a great source of inspiration for how to put together colors and patterns for on and off duty dressing. The clothes aren't the only thing that's pretty and inspirational, we also love the beauty looks. The models are always styled in an effortless chic kind of way: tousled hair, understated eyes and red-orange lips. That lip color! We think that the lips are what tie everything together, it's what takes the look from messy to chic. So after months of debating whether or not to hop on the bold-lip bandwagon, we finally decided to give this look a try!

Nos ENCANTAN los catálogos de  J.Crew. No es mentira cuando les decimos que hacemos un bailecito de alegría cada mes que los actualizan en su página. Lo que más nos gusta es que son únicos para crear sus outfits: son la inspiración perfecta para aprender a combinar colores y estampados. Otro de los elementos que nos inspiran son los looks de belleza. Las modelos siempre están arregladas de manera sencilla pero chic: peinado ligeramente desordenado, ojos naturales, y labios rojos-anaranjados. El color de labios es en definitiva lo que unifica la ropa con el peinado, evita que la modelo se vea desordenada y la hace verse elegante. Así que después de meses de estar en ese estira-y-encoge de si probar o no probar este look, finalmente nos convencimos a darle una oportunidad! 

If this does not convince you of trying a new bold lip color, we don't know what will.


After hours of pouring over google and pinterest looking for the perfect lip color to suit all skin tones, we settled on two: MAC's Cremesheen in Vegas Bolt (splurge, $18, Siman) and Revlon's Colorburst Lip Butter in Tutti Frutti (steal, $6, Wal Mart). If you decide to try this trend remember to K.I.S.S.: Keep It Simple, Sweetie! Keep your eyemakeup to a minimum and let the lipstick do its job! Now on to the reviews:

Después de varias horas de buscar el color de labios perfecto para cualquier tono de piel en google y pinterest, finalmente nos decidimos por dos labiales: MAC Creemsheen en Vegas Bolt (inversión, $18, Simán), y Revlon Colorburst Lip Butter en Tutti Frutti (BBB*, $6, Wal Mart). Si se deciden a probar este look, les recomendamos mantener su maquillaje de ojos a un mínimo (sobre todo si es de día)
*BBB = bueno, bonito y barato :)


Rating: A+ for both!

Both lipsticks are great options, which one you buy depends on how bold you want your lips to go and your budget, you could buy either and get great results!

MAC's lipstick is very pigmented, a little will go a long way. We suggest not applying it straight from the tube, but instead, dap it on with your fingers. That way you can adjust how much color you want. We love that this color is bold, so you can take it from day to night by layering on more color. It has a subtle sheen to it once applied, but it can almost look matte after having it on for a while. A con of this lipstick is that it tends to dry out our lips a little, so we suggest you apply a layer of chapstick before putting it on.

Revlon's lip butter on the other hand, is very sheer. You can apply it straight from the tube, without even using a mirror and you'll be fine. This lipstick is great if you're looking to try this look in a more understated way. It has a lot of sheen to it, almost like those squeezable chapsticks (not the stick ones) but not quite as bold as lip gloss. However, if you like matte lips, this is not your option. A big plus of Revlon's lipstick is that it's not drying at all, so we recommend not wearing any chapstick under it. If you do, because of the sheerness of the lipstick, you'll wash out the color.


Nota: 10 para ambos!

Ambos lipsticks son buenísimas opciones, todo depende de que tan fuerte quieras tu color y cuanto estés dispuesta a gastar, puedes comprar cualquiera de los dos y tener excelentes resultados!

El labial MAC es pigmentado, un poquito de este se nota bastante. Les sugerimos no aplicarlo directamente del tubo, sino hacerlo con sus dedos. De esta manera pueden controlar mejor la magnitud del color, porque si es fuerte. El labial tiene muy poco brillo, así que si les gustan los labiales mate, pueden aplicar poco color o bajar el brillo con una servilleta. Una desventaja de este lipstick es que tiende a resecar los labios, así que les sugerimos ocupar chapstick debajo.

Por otro lado, el labial Revlon es ligeramente traslucido. Lo pueden aplicar directamente del tubo (¡sin necesidad de espejo!) sin tener miedo de verse como payasitas. Este lipstick es perfecto si están buscando un look más discreto. El labial tiene bastante brillo, casi como esos chapsticks de tubo apretable (aunque no tanto como un lipgloss). Así que si te gustan los labiales mate, esta NO es tu opción. Un gran plus de este lipstick es que no reseca los labios, es más, te recomendamos no ocupar chapstick debajo para que no diluyas el color. 


pinspiration: Pinterest Tools


Pinterest addicts this post is for you. Yes, you. Don't try to deny it, you know who you are. You, who bore your tech-challenged mom, boyfriend, brother, co-worker or pretty much anyone with ears with your incessant  rambling about your latest project. You know, those cute cupcakes, or that wrap bracelet. You, who have sat at your computer for hours planning your next birthday party, searching for a recipe for the perfect chocolate chip cookies, wishing you suddenly won the lottery to be able to buy a Celine luggage bag in every color, or 1,001 different ways to eat bacon. Here at bloom, we salute you! To make it easier for you to pin all the things, we will write every week about a different pinterest tool or site we love, that will make pinning even more addictive fun. If this scares you, step away from your computer right now. You have been warned. 

So, picture this: you're sitting there, sorting through your e-mails and you see that J. Crew has updated their catalog and want to pin it all to one of your style boards. But you see, you can't do that because you get that dreaded message box: "sorry, couldn't find any pinable images in this window". But YOU MUST pin those hot pink pants and that green shift! And no, you don't want to printscreen it and the upload it. If you're resourceful lazy like us, you must download Shotpin :) It's a Chrome browser extension that makes it easy for you to take a screenshot and pin it directly to any of your boards. Just as easy as using the pin it button! If you use another browser like firefox or safari, let us know in the comments and we'll google a great option for you. We recommend Shotpin because it's the one we use and works great. Happy pinning!

FOLLOW US ON PINTEREST HERE!

Pinterest-adictas, este post es para ustedes. Nos inspiramos en ustedes que hablan sin cesar de pinterest a su pobre mamá que apenas tiene celular, a su novio, hermano, compañero de trabajo o a quien tenga orejas para escucharlas. Que le cuentan emocionadas a sus amigas de los cupcakes de flores que hicieron o de esa pulsera de enrollar. Para ustedes que han estado sentadas por horas en la computadora planeando su cumpleaños, buscando la receta para las galletas perfectas, que quisieran ganarse la lotería para comprarse una cartera Celine en cada color del arcoiris, y que han descubierto 1,001 maneras de comer tocino. Acá en  bloom, les damos un aplauso! *aplausos* Para hacer de Pinterest una experiencia más divertida adictiva, empezando esta semana vamos a estar comentando nuestras páginas de internet y herramientas favoritas sobre el tema. ¡Esperamos les sirvan!

Así que, imagínense esto: están revisando su correo y se dan cuenta que ya está disponible el catálogo nuevo de J. Crew, se meten a la página y quieren pinearlo TODO a sus style boards. Pero NO, no se puede porque tu browser te da el odioso mensaje: "sorry, couldn't find any pinable images in this window". Simplemente la vida no puede seguir si no pineas esos pantalones rosados y ese vestido verde neon! Sinceramente, te da demasiada hueva dar printscreen y subir el pin manualmente. Entonces, ¿qué hacer? Nosotras te recomendamos Shotpin :) Es una extensión del browser Google Chrome, que te permite tomar un screenshot o impresión de tu pantalla y subir directamente a cualquiera de tus boards, como que si estuvieras usando el pin-it-button. Shotpin está disponible solamente para Chrome, así que si usas safari o firefox, dejanos un comment para buscarte una buena alternativa, happy pinning! :)

runway vs bloomway: GIVE COLORFULLY!


Here at bloom we LOVE Kate Spade. We think the brand represents everything life ought to be: fun, quirky and colorful. Last christmas they had a great campaign called "give colorfully", which featured a Kate Spade girl wrapping colorful presents in a unique way using crepe paper. With mother's day coming up tomorrow, we remembered this campaign and got inspired to DIY our own gift wrap to put a bigger smile on our mom's face. We used kraft paper to make the colors pop more, and post-its for decoration, but you can use any paper you like. Happy gift-wrapping :)


En bloom nos ENCANTA Kate Spade. Creemos que la marca representa muchas con las que nos identificamos como la diversión, alegría y vivir la vida a colores. La navidad pasada tuvieron una campaña llamada "give colorfully", en la que mostraban varios regalos envueltos de manera divertida en papeles multicolores. Nosotras recordamos esta campaña y creamos este tutorial inspirado en los regalos de Kate Spade, para ponerle una sonrisa todavía más grande a nuestras mamis. Usamos papel kraft para que resaltaran más los colores de las decoraciones, pero pueden ocupar el papel que más les guste. Que se diviertan :)

Nuestro Tutorial:


The Kate Spade ad / El anuncio:


Related Posts Plugin for WordPress, Blogger...