Showing posts with label food. Show all posts

weekend food: dips

Dip Night! Clockwise from the big white one: Cucumber Dip, Palitroque Sauce,
Tomato Salsa (recipe not included but I can give it to you if you want it)


You know that saying, "live every day as if it were your last?" Of course you do. Honestly, on a day like today, I don't like that saying. If I lived every day as if it were my last, I sure wouldn't be sitting here at my desk, drinking an iced tea, waiting for these last five minutes before I can go on my lunch break. No. You know where I would be? Probably New York, hunting down a hot dog food cart (I have a craving), or London hunting down a great fish and chips place. If money were tight, I'd probably be looking for a chori (a delicious fried hot dog for those of you outside El Salvador). In any case, you know what I wouldn't spend my days doing? Working at my desk. 

It's good timing that it's the weekend, and since we're on the topic of food now, I want to share with you three super easy dips. I had a couple of chips with the cucumber one yesterday for lunch, and it was no New York, but it was hm hm yummy.


CUCUMBER DIP

Ingredients:
1 medium cucumber
1 small container of natural yogurt (I use yes, but any brand works)
1 container of cream cheese substitute (dos pinos)
Dill (eneldo)
Crushed garlic
Salt, pepper, garlic powder

I recommend doing this one day ahead so that the flavors blend well together, but it works either way. 

How To:

1. Peel your cucumber.
2. Using your peeler, slice the cucumber very finely and then chop those slices into very small pieces.
3. Salt your chopped cucumber (about 1 teaspoon) and leave it in a bowl for at least half an hour to rest. If you're in a rush you can skip this, but your dip will be thinner.
4. After the hour has passed, squeeze your cucumber to remove the excess water.
5. In a separate bowl, mix your yogurt with half the tub of your cream cheese substitute. I use the Dos Pinos In Line brand to make the dip lighter. I find it tastes just like regular cream cheese, but you can also use the real thing. Smash it well with a fork to make it smooth.
6. Mix this with your cucumbers + about a tablespoon of freshly chopped dill (you can add more) + 1 tablespoon crushed garlic. I use the one that comes pre-chopped in a bowl, but if you press it fresh, use one large clove.
7. I like my dip garlicky, so I add garlic powder, salt and pepper to taste. 
8. EAT ALL THE CHIPS WITH THIS! This one goes better with bready chips like pita crisps, or plain tortilla chips.


TUNA DIP

Ingredients:
1 container of cream cheese substitute (dos pinos)
1 can jalapeño tuna
Garlic powder, salt, pepper

How To:

1. This one is by far the easiest one. Open up your tuna can and remove the excess water.
2. Mix your tuna with the whole container of cream cheese or cream cheese substitute
3. Add 1 teaspoon garlic powder + salt and pepper to taste
4. INHALE WITH CHIPS! This one goes great with any kind of chip.


PIZZA HUT HACK DIP (palitroque sauce)

Ingredients:
3oz. ground beef
1 bag of tomato sauce (I use naturas)
1 medium tomato
1 small carrot
1/2 small onion
Red wine vinegar (optional)
Crushed garlic
Oregano, garlic powder, salt, pepper

How To:

So, I love Pizza Hut breadsticks (palitroques), mostly because of their dipping sauce. Lately, they have thinned out their sauces way too much, and they look more like meat soup than sauce. So here you go, my garlicky version :)

1. Start by chopping your tomato and onion into small squares, grate your carrot.
2. Spray your pan with cooking spray or use 1 tsp of oil, add your crushed garlic, onions, tomato and carrots. Cook them up a little in medium heat, until they start looking soft, this takes about 5 minutes. Remove them from the pan.
3. In the same pan, add the meat and season it with salt, pepper and garlic powder. Cook it until well done.
4. Mix together the meat with the vegetables, now add the bag of tomato sauce. To thin it out, take your same bag and fill it up halfway with water. Add this to the pan.
5. Add about 1 teaspoon of oregano + 1 tsp red wine vinegar if you have it
6. Lower the heat a little, and let it simmer (cook it until it starts to bubble). When to stop? If you like your sauce on the thin side, take it off the heat after about two minutes after it starts to bubble. If you like it thicker, let it cook a little longer, no more than ten minutes.
7. Before you take it off the heat, taste it for salt, pepper and garlic. Add more if needed and cook for an extra minute.
8. STUFF YOUR FACE WITH SAUCEY GOODNESS!

the pinterest awards

I think we can all agree on the fact that Pinterest is more addictive than nutella. The only days I haven't pinned something were one, because I was in the hospital and two, because I had no internet access. Those two were very sad days. 

My favorite part are the pins of the people I'm following. It's so good, I almost never click on the "everything" tab. Every month or so, I get anal and organize my Pinterest. I weed through my favorite pinners and look out for other people to follow (Refinery29 and IFB are great places to look). If you're looking to make over your Pinterest feed, I leave you with my Pinterest Awards: the very best from my boards and who I'm following :) 


ps. follow me on pinterest HERE! :)


FAVE FASHION PINNER: Eat Sleep Wear, so many street style photos on this feed! There's a reason why she has over a million followers...


FAVE BEAUTY PINNER: The Beauty Department, my fave daily dose of pretty! Love (most) of their tutorials, they have a ton of those


FAVE FOOD PINNER: It's a tie between:


sweet collections, I love love love baking, and she pins tons of great baking and cake decorating tutorials.


Food Gawker, I'm a foodie so foodgawker is my favorite from all the -gawker websites. I love their Pinterest because they only pin their most popular recipes.


FAVE HOME DECOR PINNER: Sadie + Stella, lots of eclectic interiors and design ideas!


FAVE CRAFTY PINNER: Jenni Radosevich, she has a ton of tutorials on her website, mostly DIY home decor and jewelry. Her boards are so great because she pins a lot of her inspirations.

MOST REPINNED PINNER: Miss Pin A Holic, like her name suggests, she pins A LOT. Normally she picks a subject and starts pinning everything she can find about it, from recipes for the perfect pizza to beaches in Europe to fashion week street style. 


FAVE OVERALL PINNER: The Coveteur, they pin more than just fashion (a lot of Chanel and Proenza Schouler to be found here), whoever manages their Pinterest has a great sense of humor and pins funny pics and inspirational quotes. 


FAVE BRAND PINNER: Kate Spade New York, I just love the aesthetic of this brand, so quirky and girly.

InstaBloom

What I've been up to on Instagram lately! I'm new at this so, sorry in advance for the one too many pictures of food and shoes. I love them both, they make me happy. Follow me, I'm @eu503


From the top: random shot / hot dog topping ideas / food 2 / my Milly for Sperry Topsider / food 3 /  keep calm / a great party hosting tip / sock bun / technicolor nails / another great quote / food 4 / food 5 / my two great loves: polka dots + shoes / I love buttoning up my shirts, like a geek / Kate Spade / pink party invites! / my room and DIY preview / DIY project / my sea mess of shoes / my fave Brian Atwoods


sunday funday: cheesy bacon burgers


I love bacon. I think that bacon can make anything better. I've tried the usual, with alongside my eggs with breakfast and in sandwiches. I've tried it in not so usual ways, like in chocolate chip cookies and banana bread. Because I want you to have a great sunday, I'm recommending you have bacon burgers. I also suggest you try and do them yourself. It's incredibly easy, you must trust me. You can make them in your kitchen, you don't need a grill or any fancy equipment. Just make sure to follow the tips I give you bellow. I'm no burger expert, but I am a burger fan and I've read a lot of blogs on the subject and have eaten a lot of burgers, so I do think I'm good at telling what makes a great burger. I also had coaching from the boyfriend, and he cooks and grills all the time, so he kind of is a burger expert. 

If you live in El Salvador, you've probably tried or at least heard of Rustico burgers (Shake Shack if you live further up north). I dare say, that these are that good. And a whole lot cheaper, we made three for about $10. Don't settle for McDonald's, carpe diem, have a burger and enjoy :)

Ingredients, makes 3 burgers:

3/4 pounds ground beef
1 chorizo, whichever kind you like
Bacon, as much or as little as you want
3 buns
3 thin cheddar-mozzarella slices
6 thin provolone cheese slices
Fixings: curry ketchup, dijon mustard, lettuce, chips


1. TIP: Buying your meat is the most important part. Supermarkets normally have three kinds of ground beef: regular, premium and the super duper premium kind. More expensive, doesn't mean better. The more expensive the ground beef, the less fat it has, so go for the premium kind. Your meat should contain a little bit of fat to make your burgers tastier and juicier. 

Mix your meat with your chorizo (take it out of the casing) and a teaspoon of pepper. A good burger doesn't need anything more than pepper and salt (more on salt later). Trust me. Don't add any mustard or sauces, I've seen people do this, but good meat doesn't need this.

2. Take a third of the meat and form a patty with your hands. Add a cut up slice of cheddar-mozzarella cheese

3. Close up the patty so that the cheese gets trapped in the middle. Think pupusas for the technique, but don't make the patties too flat. The patty should fit in the palm of your hand and be about an inch thick. 

4. TIP: NOW is the time to salt your patties. Salt them on both sides right before they hit the pan. DO NOT salt your meat when you're making the patties. Having salt in the middle of the patties makes them loose their juices while they're cooking, resulting in dry burgers. It's worse if you form the patties and you don't cook them right away. If you salted them before hand, they will lose all their juices while resting. Nobody likes dry burgers. 

Heat up your pan, spray it lightly with non stick cooking spray. Place your patties in the pan.


5. For well done burgers, they should cook about five minutes on each side. Flip them often! I once saw on the Food Network that this is the way to go, so this is the way I make mine. 

6. Don't worry if a little bit of cheese oozes from the burgers. 

7. This is what the burgers should look like when they're done.

8. TIP about the bread: don't use burger buns. Hit your favorite bakery and ask which bread they recommend for burgers. I bought these buns at San Martin, they're round chiabatas. Great tip from the lady at the bakery!


9. Cheese them now! The heat from the burger will melt the cheese. This is why it's important to ask for extra thin slices. You should be able to almost see through them. 

10. Add the bacon now! The more the better. We used candied bacon, check out the how-to below.


11. More bacon

12. And more bacon. Lettuce in the background, for a little added green and crispiness

13. A good burger always needs chips, enjoy! I made is yesterday, my mouth is watering right now from writing this, just so you know


THE EXTRAS: candied bacon and chips! 

Burgers need sidekicks, and I mean good sidekicks, not the Batman-and-Robin kind, think Batman-and-Alfred. Bacon and chips are the Alfreds to our Batman.


There is no burger without bacon, end of story. If you'd like to make your bacon even better (it IS possible), try it candied. I always make my bacon in the toaster oven, it's less messy and you don't get bacon fat on yourself. Set your oven to medium low heat so that you don't burn the bacon. Mine took about 20 minutes to be ready, but it varies from oven to oven and heat setting so watch yours closely. 

To make candied bacon: Add brown sugar to the bacon halfway through it's baking (about 10 minutes in), it should still have some pink parts on it. Go for about half a teaspoon of sugar per slice. Pop them back into the oven for another extra 10 minutes. 

Chips are also very important for burgers. We were too lazy (and hungry) to make french fries, so we stuck with potato chips. The real kicker came from these Jalapeno Popper Cheese Curls. If you like spicy food, you MUST try these! They're incredibly good. Bought them at Super Selectos.


DIY Monday: Cake Stand!


Hi everyone :) Sorry I've been a little absent from the blog, but my day job has been keeping me busy and my computer broke down! I've been a little bit of a victim of Murphy's law lately, but whatevs.. I've you've got a pinterest account, you must have noticed by now a lot of random pins featuring lovely dessert tables. Most of them are for children's or bachelorette parties, and while I don't have kids nor am getting married yet, that hasn't stopped me from wishing I had a cake stand, aka an uncomitted girl's dessert table. If I can't have an entire table, at least I'll have a cute place to put my weekly cupcake. 

This reminds me of a Sex and the City episode where Carrie so wisely points out "Think about it. If you are single, after graduation there isn’t one occasion where people celebrate you … Hallmark doesn’t make a “congratulations, you didn’t marry the wrong guy" card. And where’s the flatware for going on vacation alone?" Albeit we do celebrate birthdays every year, we only get one tiny celebration a year?! So join me and make your own cake stand and have some cake and celebrate "I am fabulous" day! :) 

(Boyfriends, husbands and kids welcome but not required) 

Sorry, but I had no cake this weekend to top it off


Materials: 
1 candle stick 
1 cute plate 
Glue gun 

It's a no brainer to make, you just take your gun and glue your candle stick to the back of your plate. You have to be somewhat careful when handling it, because the glue gets hard and breaks with time, but it's not like you use a cake stand every day, so it should last you a while. And if it breaks, you just take your trusty glue gun and put it back together again, it's no Humpty Dumpty!

I bought all my materials at a hardware store (Vidri) for less than $10. Beats the ridiculous prices of over $35 I found for cake stands at our local shops and online.

people I admire: The Pioneer Woman

Ree Drummond, better known as the Pioneer Woman is awesome. She lives in a ranch in the middle of nowhere with hey cowboy husband, her kids and horse and cow poop on her porch. She blogs about cooking, her family, and household chores. It doesn't sound very entertaining, but trust me, it is. The 23 million people who visit her blog monthly also agree with me. What makes her amusing is that she wasn't born in the country, she used to be a city girl who, after falling in love with a cowboy, had to move to the country: "from black heels to tractor wheels" as she likes to call it. Her life and cooking are seriously inspiring, it shows how you can still go after your dreams, no matter where, no matter how, under your own terms. Even Amanda Brooks, the former Fashion Director of Barney's has been inspired by Dree. 

I leave you now why my first ever Pioneer Woman recipe: Key Lime Pie. It's ridiculously easy, and all of the ingredients are cheap to buy, in case you don't have them on hand. I usually don't like tart desserts, but this made me lick the spoon. Check out the photos of my pie making bellow, and you can get the recipe for the pie here!

Ree Drummond, mejor conocida como la Pioneer Woman es lo máximo! Ella vive en un rancho en medio de la nada con su esposo "Marlboro Man" (por vaquero), sus hijos, sus caballos y sus vacas. Ella tiene un blog relacionado sobre todo a recetas de cocina, su familia y su hogar. Puede que no suene muy entretenido, pero créanme que lo es. Los 23 millones de lectores mensuales de su blog creo que estarían de acuerdo conmigo. Lo que hace divertida su perspectiva de la vida en la granja es que ella tenía un estilo de vida más parecido al de Lauren Conrad, pero se mudó a la granja después de casarse. Su vida y su cocina son realmente inspiradoras, demuestran cómo siempre puedes perseguir y alcanzar tus sueños, sin importar dónde y cómo. Incluso Amanda Brooks, la ex-Directora de Modas de Barney's se inspiró en Ree para cambiar su trabajo.

Las dejo con mi primera receta de Pioneer Woman: Key Lime Pie. Es ridículamente fácil de hacer, y en caso que no tuvieran todos los ingredientes en su casa, son baratos en el super. Como regla general, no me gustan los postres que tienden a lo ácido, pero con este me repetí. Pueden ver las fotos del pie abajo, y la receta la pueden conseguir aquí!


sugar rush: rose cake

When I was in high school I took chemistry and every single time we did an experiment, I would mix everything I could get my hands on, even those we weren't supposed to combine. Nothing special ever really happened aside from bubbles and changes in color, but I loved the thrill. That's why when all of those mentos and diet coke videos started popping up on youtube, I knew I had to do it. It's been a while since I've read anything that  called to my inner scientist, until I read about soda cakes. It works like this: mix 1 boxed cake mix (any kind) + 1 can soda = DIET cake. No kidding. It's diet because there are no oils, fats nor eggs added to it IF you use sparkling water or diet soda. 

I tried mine using sparkling water and it worked perfectly! The cake is super light and fluffy and it tastes just like a normal cake. Follow the same cooking times and temperatures as stated on the box, the batter works great for both cakes and cupcakes. A tip, spray your baking tin with cooking spray and/or line it with parchment paper so that the cake doesn't stick. I haven't tried this, but I read online that it tastes really good if you try one white cake mix with strawberry or lemon soda. I have my eye on trying this with a blood orange Pellegrino.


Cuando estaba en el colegio, teníamos clase de química y cada vez que hacíamos un experimento, tenía mezclar todas las cosas para ver si pasaba algo. La verdad que nunca pasó nada extraordinario, solamente un par de burbujas y cambios de color, pero me encantaba hacerlo. Como me encanta la travesura siempre ando buscando con qué experimentar, y este pastel de gaseosa me sonó perfecto! Si mezclas 1 caja de mezcla de pastel + 1 gaseosa = pastel. Se supone que es de dieta si se usa agua mineral o diet cualquier cosa, ya que no lleva ni aceites, grasas ni huevos. 

Yo usé agua mineral para mi pastel, y quedó con una textura super light y esponjosa y el sabor es idéntico al de pastel hecho con grasa. Un tip, hay que engrasar bien la lata para hornear para que no se pegue el pastel (yo ocupé un spray). No lo he intentado, pero leí que sabe muy rico si se mezcla una gaseosa de fresa o limón con una caja de white cake mix. Quiero intentarlo con las Pellegrino de blood orange que he visto en el super!


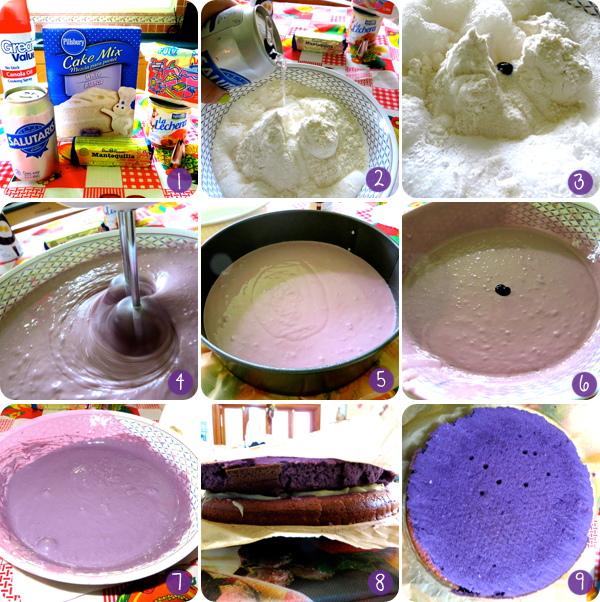
1. Ingredients: Boxed cake mix (white or vanilla), can of mineral water, food coloring, cooking spray, filling of your choice, frosting of your choice // Mezcla de pastel de caja (blanca o vainilla), lata de agua mineral, colorante en gel, spray de cocina, relleno y turrón de tu elección
2. + 3. Mix together the cake mix + soda + drops of food coloring // Mezcla el agua mineral con el mix de pastel y unas gotas de colorante
4. + 5. Once you're happy with the color of your batter, pour half of it into your cake pan. Don't forget to grease it! Bake it according to the directions on the box // Vierte la mitad de la mezcla en un molde engrasado y horneala de acuerdo a las instrucciones en la caja
6. + 7. Pour more drops of food coloring into the remaining batter, mix it well and bake it // Agrega más gotitas de colorante, mezclala bien y hornéala
8. Once the cake layers are cool, fill them (I used condensed milk and pastry creme) and stack them. If they're still warm and you do this, they might crumble // Una vez las capas estén frías, rellenalas (yo ocupé leche condensada y crema pastelera) y ponlas una sobre otra. Si haces esto con las capas calientes, probablemente se quiebren y el relleno se derrita
9. You're now ready to decorate your cake! // El pastel está listo para ser decorado!


The Inspiration!


As for the decorating of the cake, I'm in love with the rose cakes Amanda from I Am Baker shows on her blog. She recently posted a how-to video (check it out HERE). I tried it and it's easy, the trick is the tip you use. The bigger the tip, the better. I used a 4 tip I bought at Pimi, but I think it was too small so the roses didn't come out perfectly, but I still loved the look! Check out the photos for more tips and if you have any questions, email me at lifestyle503@gmail.com Happy baking! :)

A shout out to my lovely assistant, aka the boyfriend, for taking all the pictures for this post. He ate about half the cake and loved it, and he's not much of a dessert guy so I think it was a success!

Para decorar el pastel: Estoy enamorada de los pasteles de rosas que hace Amanda en su blog I Am Baker. Hace poco posteo un tutorial sobre cómo hacer las rosas y es super fácil, el truco está en ocupar una punta de duya lo más grande posible. Yo compré mi punta en Pimi (tamaño 4) pero creo que resultó ser demasiado pequeña para las rosas que quería. Les recomiendo comprar el siguiente tamaño, vale $1.45 cada punta. Pueden ver las fotos para más tips y si deciden hacer el pastel y tienen preguntas, me pueden escribir a lifestyle503@gmail.com. Happy baking! :)

Un saludo especial para mi lindo asistente, aka el novio, por tomar todas las fotos para este post. Se comió la mitad del pastel de una sentada, y como casi no le gustan los postres considero que fue un éxito!


1. + 2. Cover the cake with a light layer of frosting // Cubre el pastel con una capa de turrón
3. + 4. + 5. Put the remaining frosting in the bag, use a glass to do this, it helps a lot // Pon el turrón sobrante en la duya, usa un vaso para esto, ayuda mucho!
6. Begin frosting! Start from the inside using a large open star tip. Check out the tutorial HERE // Comienza a decorar! Usa una punta de duya de estrella grande, haz circulos comenzando desde el centro. Si necesitas ayuda mira este video!
7. + 8. The view from the top! // El pastel desde arriba
9. A peek into the purple ombre layers // Una mirada a las capas de pastel moradas

I used this recipe for the frosting, substituting the lard for butter. You can also buy the already made kind, just make sure the can says WHIPPED. To make it stiffer and good for decorating, mix in a 1 pound bag of confectioners sugar. 

Yo usé esta receta para el turrón, sustituyendo la manteca por mantequilla. Si quieren un camino más fácil, compren del turrón de supermercado y mezclalo con una bolsa de 1 libra de azúcar glass. Hay que fijarse que la lata diga WHIPPED, sino será demasiado cremoso y las flores no mantendran su forma. 

our FIRST week in pictures


Si no nos siguen en twitter, les compartimos nuestra primera semana online: organizamos una piñata, shopping finds y postres riquísimos :)

In case you're not following us on twitter or missed something, we break down our first week as bloom: we organized a little girl's birthday party, shopping finds and some delicious treats :)

Twitter: @bloom503

MUST TRY THIS WEEKEND

Se nos viene encima el Día de la Madre y por eso en bloom vamos a pasar el finde haciendo planes para que nuestra mami tenga el mejor día del año! Les dejamos una idea de regalo para mamá (P.S. está RIQUISIMA) ¡Que tengan un feliz fin de semana!

Mother's Day is coming up this thursday, so we're spending the weekend making plans so that our mom will have THE best day of the year. Here's an idea to try, and there's fun in it for you too for test-driving it. Have a great weekend!


MACARONES FRANCESES / FRENCH MACARONS

Últimamente los cupcakes están por todas partes, y aunque son lindos, tu mami se merece algo fuera de lo común y especial. Por eso, te recomendamos le regales una caja de macarons franceses. Los macarons son galletas de almendra en forma de sandwich rellenas de crema de sabores o jalea. Te garantizamos que no te vas a poder comer solo uno! Los recomendamos como regalo para tu mami porque no solo saben rico, sino que son lindísimos! 

Los podes conseguir en sabores frambuesa ganache, limón, chocolate oscuro, pistacho, coco y chocolate blanco. Vienen en caja o individuales en cualquier Le Croissant (nosotras hemos probado Multiplaza y Escalón, y nuestros favoritos son el de chocolate blanco y el de chocolate oscuro).

Forget cupcakes! Macarons are the perfect dessert for mom. Macarons are a french cream filled sandwich cookie made of almond flour. It will fill you up with warm fuzzy happiness after one bite, guaranteed! They make a great gift because of all the pretty colors they come in. 

You can get them in lemon, dark chocolate, white chocolate, pistachio, coconut and raspberry ganache flavors. They come boxed at any Le Croissant (we've tried them at Multiplaza and Escalón and highly recommend the white chocolate and dark chocolate ones). 
Related Posts Plugin for WordPress, Blogger...